Skip to content

Posts tagged ‘Project’

3
Jan

Project Silicon Page 3

Project Silicon

Project Summary:

Inspired by Mashies conversion of a Silicon Graphics O2 case I sourced a similar case for a project of my own. These are very cool little cases but its a tight squeeze to fit a MATX sized motherboard inside. There have been three different versions of this project as I wasn’t happy with the first two. After nearly two years in the making its now finished. The specs of the final system is a Pentium IV 2.26ghz cpu, 512mb of Corsair Ram, 160GB Seagate HDD, Sony DVD writer and a Sapphire 9600XT Ultimate.


Previous Page | Next Page

1 | 2 | 3

Project Silicon: Version Number 3

2005-03-24

Ok here is a mega post bump hehe, I’ve finally found the time for modding. I’ve kept Project silicon on hold for ages now and it needs to be finished. So I’ve got my backside in gear and done some new work on this project.

I wasn’t happy with the previous riveted chassis now that I have a bending brake as I could make a new chassis that was much cleaner with one main sheet of aluminium. I will use my new nutsert tool to attach threads for attaching the other pieces together.

Here is the main section of the chassis I’ve cut and bent into shape.

Project Silicon: Sgi 02 Conversion


Project Silicon: Sgi 02 Conversion


Project Silicon: Sgi 02 Conversion


The chassis is held in place with 4 screws on the bottom.

The motherboard just slides into the chassis and is held in with plastic standoffs as before.

Project Silicon: Sgi 02 Conversion


With this new re jig I’ve decided to mount the hard disc on the bottom of the chassis this was where the psu went in the old design which blocked two pci slots, the hard disc just blocks one and I seeing as I dont need all three its no problem. I may change it to the top of the chassis at a later date though with moving the psu where I plan this would be possible.

Project Silicon: Sgi 02 Conversion


Project Silicon: Sgi 02 Conversion


For those interested in the nutset tool here is the kit/the nuts themselves and how they look in place.

Project Silicon: Sgi 02 Conversion


I’ve just sleeved and redid the cold cathodes for this project with the help of my girlfriend I hate sleeving its quite useful to have a helping hand.

Project Silicon: Sgi 02 Conversion


I’ve also taken a quick couple of shots of the heatsink, its a swiftech heatsink with a noiseblocker fan and a lovely laser cut fan grill.

Project Silicon: Sgi 02 Conversion


I’ve sleeved the two noiseblocker fan, I’m using one 80mm on the heatsink and a 92mm for case cooling.

Project Silicon: Sgi 02 Conversion


I’ve started work on the back panel. Its going to have a single 92mm fan mounted in place. After a bit of a scary moment with my holesaw I had a nice blow hole in the back panel.

Project Silicon: Sgi 02 Conversion


I didnt get a chance to do much modding today but I managed to mount the rear fan. I’m using some nice allen key m4 bolts. I will also be mounting a “tenderfoot” on the back of the fan to give it a nice look. Just a couple of pictures for you all to see.

Project Silicon: Sgi 02 Conversion


I’ve spent my time over the last few days working on the back panel. I’ve pretty much finished it now. I’ve also fitted the optical drive to the top of the chassis.

The first pictures are of the optical drive in place.

Project Silicon: Sgi 02 Conversion


Project Silicon: Sgi 02 Conversion


And these pics are of the back panel being built and in place.

Project Silicon: Sgi 02 Conversion


Project Silicon: Sgi 02 Conversion


Project Silicon: Sgi 02 Conversion


Another daily update, this time its the power supply that has got sleeved. I’ve changed the connectors for black of blue versions and used the same sleeveing used elsewhere in the project.

I hate sleeving things and this took ages but I’m very happy with the results. The white connector is for the power plug loom so I know which it is and don’t blow the thing up hehe. I’ve also brushed the psu and clear coated it.

Project Silicon: Sgi 02 Conversion


Project Silicon: Sgi 02 Conversion


The sata connector is right pain to fit I broke one in the process of fitting it.

Project Silicon: Sgi 02 Conversion


A quick update from today, I’ve done a few little jobs but the main two were sleeving the power cable for the psu and mounting the psu onto the supporting strut.

Project Silicon: Sgi 02 Conversion


I’m coming to the end of the project now, I’ve one drill hole left to do and then its onto the installations of all the parts.

Over the last few days I have installed the cpu and heatsink into the motherboard to get it ready for installation.

Project Silicon: Sgi 02 Conversion


I’ve also installed the switches and leds, I used them in the projects last iteration and they are still good so I slung them into place.

Project Silicon: Sgi 02 Conversion


I have also brushed the outside of all the panels to give a good final look, its a bit hard to shoot the brushing, these pics are poor it looks much better in the flesh.

Project Silicon: Sgi 02 Conversion


Finally I wired up a rheostat to control the two fan’s speed and again sleeved it in the blue sleeving.

Project Silicon: Sgi 02 Conversion


Well almost two years in the making Project Silicon is finally finish for the the 3rd and FINAL time hehe.

I encountered a few problems on the way to the final installation but I have over come those problems now.

One of the last few jobs was to install the rheostat into the rear panel, I’ve used a blue aluminium knob on the rheobus to complete the blue theme.

Project Silicon: Sgi 02 Conversion


Project Silicon: Sgi 02 Conversion


I then started to install all the parts into the chassis, a few problems cropped up first off the power cable to the sata hard drive wouldn’t fit so I had to redo the loom for that connector. Second the power connector for the optical drive was wired incorrectly so I sorted that problem out. I had a problem with the ide cable , it was for two devices so I just cut off the extra one to tidy things up. It was all downhill from there thankfully. One problem I also encountered is that I over estimated how much cable I really needed so many of the cables are a wee bit too long which is a bit annoying but can be worked around.

I decided to leave the side bit open to allow airflow to the psu it makes sure the system doesn’t overheat.

A quick couple of pics mid installation:

Project Silicon: Sgi 02 Conversion


Well here is the final "glamour" shots of the complete project silicon.

Project Silicon: Sgi 02 Conversion


Project Silicon: Sgi 02 Conversion


Project Silicon: Sgi 02 Conversion


Thats just the case on its own, I’ve tied it up with a hercules 17in tft and microsoft bluetooth keyboard and mouse setup to finish it off. Its going to be my girlfriends rig and she likes it very much.

Here’s some more shots with everything turn on and hooked up, you can see the twin cathodes giving off a nice bloo glow.

Project Silicon: Sgi 02 Conversion


Project Silicon: Sgi 02 Conversion


Previous Page | Next Page

1 | 2 | 3

3
Jan

Project Silicon Page 2

Project Silicon

Project Summary:

Inspired by Mashies conversion of a Silicon Graphics O2 case I sourced a similar case for a project of my own. These are very cool little cases but its a tight squeeze to fit a MATX sized motherboard inside. There have been three different versions of this project as I wasn’t happy with the first two. After nearly two years in the making its now finished. The specs of the final system is a Pentium IV 2.26ghz cpu, 512mb of Corsair Ram, 160GB Seagate HDD, Sony DVD writer and a Sapphire 9600XT Ultimate.


Previous Page | Next Page

Page 1 | Page 2 | Page 3

Project Silicon: Version Number 2

2004-06-05

Some of you have been following my work of late will have realised I’ve been working on Project Liquid Bloo mainly of late.

I have got to the stage of the project where I have moved the cpu ram etc over from my old SGI mod project Silicon. This forced me to take apart Project Silicon and give me some fresh ideas on the project. I decided I didn’t like the original inner case and that I could do things much better.

So I decided to make a new inner chassis. I intend to use aluminium sheet with L shape aluminium on the edges fixed together with rivets. I had a shock this afternoon after coming back from the store with the parts to see Mashie had decided to use the same materials on his SGI case remake as well. So a big sorry to mashie for picking the same materials, I know he will create something very different to mine in the end.

Project Silicon: SGI O2


Project Silicon: SGI O2


I tried to keep the structure as simple as possible with as few parts as I could.

Project Silicon: SGI O2


Project Silicon: SGI O2


Project Silicon: SGI O2


The chassis was brushed and painted with clear coated to protect the surface, I created two 80mm blow holes at the rear to keep the case nice a cold.

Project Silicon: SGI O2


Project Silicon: SGI O2


I brushed the power supply and combo drive to match the chassis.

Project Silicon: SGI O2


I was trying to get this version ready for a tv show, but during the final build phase an error I made in the wiring blew both the combo drive and my hard disc. I never got to finish this version properly.

The film shoot was fun , big hellos to mashie and macroman who joined my on the day. It was a long but fruitful day. No pics of my mods but heres us on the day.

Here’s mashies work the pics dont do them justice:

Project Silicon: Sgi 02 Conversion


Project Silicon: Sgi 02 Conversion


Macroman didnt bring any of his projects unfortunately but here’s his rig he was demoing for the program.

Project Silicon: Sgi 02 Conversion


Macros nice collection of weapons hehe.

Project Silicon: Sgi 02 Conversion


And some final mug shots.

Macro and myself:

Project Silicon: Sgi 02 Conversion


Myself , Macro , Aleks (the nice presenter) and Mashie:

Project Silicon: Sgi 02 Conversion


I totally failed to take any pictures of the car pc I took along what a tool I am 😀

Previous Page | Next Page

1 | 2 | 3

3
Jan

Project Silicon Page 1

Project Silicon

Project Summary:

Inspired by Mashies conversion of a Silicon Graphics O2 case I sourced a similar case for a project of my own. These are very cool little cases but its a tight squeeze to fit a MATX sized motherboard inside. There have been three different versions of this project as I wasn’t happy with the first two. After nearly two years in the making its now finished. The specs of the final system is a Pentium IV 2.26ghz cpu, 512mb of Corsair Ram, 160GB Seagate HDD, Sony DVD writer and a Sapphire 9600XT Ultimate.

Previous Page | Next Page

Page 1 | Page 2 | Page 3

Project Silicon: Version Number 1

2003-11-10

Well now that Project Bad Apple is complete its time to start working on my next project.

I was disappointed that the apple case was a bit too big for me as I’ve got used to having a small shuttle sized pooter, so I wanted my next project to be something smaller but still have a good sized mobo.

I remembered mashie’s entry to this years CPL Project Oenone and had a look at the size and it was perfect. I managed to source a Silicon Graphics O2 via ebay but not through it. It cost £122 with scsi cdrom and psu both of which will be ditched obviously. ( Project Oenone : www.mashie.org )

Clearly this isn’t the first time some1 has done this mod and I have to give big credit to mashie for the idea in the first place. I will be trying my hardest to make it different where possible. I have a long term idea that would be very different but cost could be very preventative.

I only got the case this morning and here it is:

Project Silicon: SGI O2


I then set about taking it apart it took some time to work out how exactly to do this but I got there in the end.

Project Silicon: SGI O2


Project Silicon: SGI O2


First thing to do now was to give it a blooming good scrub so I took the plastic parts into the bathroom to clean the dust off.

Before:

Project Silicon: SGI O2


After:

Project Silicon: SGI O2


This is going to be a very tight fit to get the board and everything in place eeek.

And finally here is a shot with project bad apple in the background to give u and idea of the scale.

Project Silicon: SGI O2


This project went through many different variations the first one used rough aluminium bends to create the inner chassis. The psu and hdd drive were mounted in a section behind the motherboard.

Project Silicon: SGI O2


Project Silicon: SGI O2


All the cabling was sleeved using chrome/silver braiding, and I intended on using a matrix orbital mx2 lcd, this would require me to split the lcd into its two sections. Unfortunately when doing this I killed the lcd sniff. I used some custom made fan grills made by kong on bit-tech.net and with the bit-tech logo.

Project Silicon: SGI O2


By the end there was quite a few sections of aluminium that made up the chassis. I made some special thumb scews to hold the back panel in place. A guide to making them can be found on the modding page.

Project Silicon: SGI O2


Project Silicon: SGI O2


And the finished article for this variation is shown below.

Project Silicon: SGI O2


Previous Page | Next Page

1 | 2 | 3

1
Jan

Project Focus

Project Car Pc

Project Focus Summary:

MiniITX motherboards have changed the modding scene dramatically a motherboard this small means you can squeeze it into much smaller places. In this mod I took a Ford Focus Shell from a radio controlled car and fitted a full working PC inside. This project has featured in Custom PC magazine.


Project Focus: Full Project Log

2003-03-03

Project Car Pc


Introduction:

The traditional beige personal computer has been going through a dramatic change over the last few years. Following on from Apple’s lead in great looking non beige boxes people have realised that a computer can look good and still do its job. The modding communities have taken the lead and have made the manufacturers sit up and take note. Idea’s that were not even conceivable 2 years ago can now be accomplished very easily. There are now motherboards that take up approximately the same space as a tradition CD ROM drive. This leads to lots more places/ways you can build a pc.

For Project focus I exploited the new MiniITX form factor and set about building a computer that from the outside would look like a model car. Using a body shell normally used in the world of radio controlled cars means that some of the luxuries of a normal pc case are not available,but what you sacrifice in size you more than make up in looks and individuality.

This is not the first time that a PC has been made to looklike a model car, there was originally a larger MicroATX car pc’s that were manufactured commercially for a short while. Then along came a modder under the name of BlueSmurf. BlueSmurf created a project for the manufacturer VIA based inside a Volkswagen Beetle radio controlled car shell.
This gave me the idea to create one of my very own.

I started this project more by accident then any long term plan. I having seen Project Jelly Bean by BlueSmurf which was so neat and clean and having a spare MiniITX board going spare so had to find a use for it, Project Focus was born.

Walkthrough

The board itself was a Via Epia 5000; this mainboard is a mere 17cm x 17cm in size. Included is a 533 MHz processor actually soldered into the board so upgrading it is out of the question. Importantly the board has On-board audio, graphics and Ethernet LAN. This means it’s a complete solution; all you need is to add SDRAM, PSU and a hard disk to have a working computer. The whole ethos behind this form factor is small size, low power consumption and minimal cooling requirements. It’s not going to win any prizes in the raw speed stakes but it’s a good platform for modders.

The part that is most important in this project was the shell itself. There are many different sizes of radio control car shells, the most common of which is around 200mm in length; there are much larger versions that are 280mm in length. With the motherboard only measuring 17cm square the smaller version was most suitable. I just had to pick a shell I liked and that would allow me space to fit the components. I needed one that was fairly high at the rear; looking on www.apexmodels.co.uk there are several manufacturers that make these shells I chose HPI ones as they are good quality and come in lots of different shapes. I narrowed the choices down to two; the Peugeot 206 WRC and the Ford Focus WRC. I’ve always been a keen follower of the World Rally Championship and love the look of both of these cars. In the end I chose the Focus as it has the most space to play with. While I was buying the shell I picked a nice blue metallic paint for the shell. I could have gone with the full rally look but I preferred the more subtle colour it would also reduce the number of stickers I would have to use.


Project Car Pc
Project Car Pc
Project Car Pc
Project Car Pc


Once I had purchased the shell I was free to source all the other parts. Normal ATX parts were out as they are too large. The power supply I located was a cheap 200W MicroATX PSU. Next I looked for cheap laptop parts, I was after a hard disc and optical drive, and I managed to source a second hand 6 gigabyte laptop hard drive and a laptop DVD-ROM drive. These are about half the height of a normal drive so they are very small. Laptop parts are not connected in the same way as normal IDE devices they have a different pin layout this meant converters were required to hook them up.
At the time it was hard to source any in the UK, nowadays they are available from a multitude of stores including; www.kustompcs.co.uk.

The hard disc version requires a normal four pin Molex power connector and the optical drive one uses a floppy disk style power connector. They are plugged into the back of the drives in the same way the cables normally are then the cables are plugged into the converter.

Once I had all the parts I required I ordered some 2mm thick aluminum sheet from www.maplin.co.uk. This was going to be used as the base for the project. I measured out roughly the layout of the shell and cut it out with a reinforced cutting wheel tool on a Dremmel. I could have used a jigsaw but I’m a fan of the Dremmel tool as it’s the tool I most used to. Once I had the rough shape I used a file to tidy up the base so that the shell would fit cleanly over the top. This took a few hours of tiring work but it was worth it.


Project Car Pc


At this stage I wasn’t sure what I was going to do with the wheels, I had managed to purchase a set of white spoked wheels from a local shop, I had sprayed them silver to look more like alloy wheels. I took the tires from an old radio controlled car and glued them onto the wheels. I decided that the best way to fix them in place was to use normal bolts and have some metal at right angle to the base. My first thought was to use an L shaped bracket but I decided I could use the existing metal in the base. I measured the place where the wheels were going to go, and cut two slits the thickness of the wheels into the base. Next up I used the trust hammer and my front door step to bend the metal to 90°. This took some time to get it perfect but it worked very well.


Project Car Pc
Project Car Pc


I was finally able to lay out the components for the first time; this I quickly realized was a problem. The PSU was too high; it simply wasn’t going to fit. Luckily, I had found out that there was a much smaller PSU now available. The 55W Morex PSU uses a small circuit with an external brick much like found on Laptops. This freed up space inside and I was able to cram it into place. The layout I chose was to have the hard disc and PSU underneath the mainboard with the DVD drive at the rear and spacers to raise the mainboard high enough.


Project Car Pc
Project Car Pc


For the electronic side of things I bought two switches and wired them onto the mainboard and mounted them at the front of the base. All along I wanted to light the shell with headlights and brake lights and internal lights also to show of the interior. Using 5mm LED’s I had two white LED’s as power LED’s shining at the front and two red LED’s as hard disc LED’s at the rear. In the interior I used four blue LED’s to show everything off.


Project Car Pc
Project Car Pc
Project Car Pc
Project Car Pc


The last few jobs in order to finish was to finish the shell, I did this exactly as you would for a normal RC car it took a couple of hours. I also cut out a small hole where the number plate would be, this would be where the cables would feed through.


Project Car Pc
Project Car Pc


I finally got to boot up the machine for the first time and it didn’t work. After much swearing and cursing, I had found the problem was the PSU shorting out on the base. A quick covering of tape later and everything worked fine. I had a working PC that looked just like a model Ford Focus. At the moment the specifications are: Epia 5000 mainboard, 192Mb SDRAM, 6 Gigabyte hard drive, DVD-ROM drive and a 55W Morex PSU. I tend to use it as a silent downloading machine which I can leave on all night if necessary.


Project Car Pc
Project Car Pc
Project Car Pc
Project Car Pc


Project Focus: Remaking the chassis

2004-05-21

Well, this is now my fourth project running concurrently so I will apologise for gordy modding overload hehe. Due to a forth coming event I needed to look at project focus and give it a good tidy up. While I was at it I decided I may as well give it a proper make over and clean up.

Here is the project as it was this morning and when you all last saw it:

Click on the thumbnails for full 800×600 shots


Project Car Pc
Project Car Pc
Project Car Pc
Project Car Pc


Project Car Pc
Project Car Pc
Project Car Pc
Project Car Pc


I took everything out to start the chassis a fresh, I will be using aluminium sheet with L shaped aluminium sections riveted in place.

First thing to do was to cut out a new chassis plate:


Project Car Pc
Project Car Pc
Project Car Pc
Project Car Pc


I then cut 4 L shaped sections out to attach the wheels to:


Project Car Pc
Project Car Pc
Project Car Pc
Project Car Pc


Thats probably all for the day unless I can sneak in some more modding later.

It all needs to be finished by the 2nd of june so i will be finishing this mod quickly.

Hope you all like the progress so far 🙂

Project Focus: Finishing the chassis work

2004-05-22

I’ve done some more work on the chassis today. I’ve drill all the holes for the hard disc and psu board. I’ve rounded the corners of the chassis plate so it fits inside the shell. heres the pictures from today:


Project Car Pc
Project Car Pc
Project Car Pc
Project Car Pc
Project Car Pc


Next up is to redo all the wiring and tidy it up as its far too long and untidy at present.

Project Focus: Finished for the second time

2004-05-24

I’ve pretty much finished this revisit of Project Focus. Its looking far better than it did before. The chassis is now much cleaner and better to look at.

First job of the day was to redo the wiring looms , they were far too long before taking up valuable room underneath the motherboard. I shortened the main wires and rewired completely the power for the psu. I also made up a new power switch.


Project Car Pc


I then mounted the dvd drive at the rear of the chassis, I had to add a new l-shaped aluminium section to hold the drive in place. The drive fits snugly between the two wheels.


Project Car Pc
Project Car Pc


Next I had to finish the chassis, I cut a small section out of the rear of the chassis to allow cables to exit the case cleanly. I also cut a small square hole out for the power switch. After these had been done I set to work brushing the aluminium. This was nice and easy to do. With a quick coat of clear coat spray paint the finish is very nice.


Project Car Pc
Project Car Pc
Project Car Pc


Then it was time to add all the components and the cables back onto the chassis.

Project Car Pc
Project Car Pc
Project Car Pc


A quick shot of the base with all the parts in place including the switch for powering on the pc.


Project Car Pc


Now pretty much everything is installed and you can see how the drive is accessed


Project Car Pc
Project Car Pc


And finally some shots of the shell on the chassis and the pc under my tv in the lounge where it lives:


Project Car Pc
Project Car Pc
Project Car Pc
Project Car Pc


I have not put the lighting back in as it takes up so much room with all the cabling and it looks very untidy, I may add it back in with a tidier wiring setup at a later date. When time allows.

The project was nice and quick as I have to get on with my other projects as I have a deadline for this and project silicon to be finished by.

Project Focus: New Wheels

2004-08-11

I’ve been quiet on the mod front of late , that due to having to work on something secret. Its almost finished so I will be back working on my other projects on the go.

In the mean time , I got some new wheels for this project focus which look ace.


Project Car Pc
Project Car Pc
Project Car Pc


Project Focus: Better Pictures

2006-08-04

It’s about time I added these new pictures to this log, they are better shots that the others!

Project Car Pc
Project Car Pc
Project Car Pc


Project Car Pc
Project Car Pc
Project Car Pc


30
Dec

Project Bad Apple

Project Summary:

Some of my favourite case designs have come from Apple and I have always wanted to convert one of their cases for PC use. I finally got the chance with this project to do just that. This project has featured in both Custom PC magazine and on Hexus.net

Project Bad Apple: Full Project Log

2003-09-01

Apple computers have for a long time now led the world in design. They were the first mainstream manufacturer to make a pc look any good. They rewrote the rules for the beige box. To get a pc that looks as good as a Mac is quite hard even nowadays. I’ve long been a fan of the G4 case and was determined to get hold of one for a project. After almost 2 years I finally got my wish. This article will describe the route I took to complete the project I named ‘Project Bad Apple’.

A Quick Note or Two.

This project guide is going to be slightly different to the normal project log: it is going to be very text heavy. A picture speaks a 1000 words and its much easier for you to get the idea of what I’ve done with them. I took well over 300 images during the build I have used the best ones. I’ve tried to explain how I did everything in the most obvious order not in the order that I did it so if I get confused about the time sorry.

If you intend to copy or repeat any of the mods described in this article please be aware some of them have inherant risks and should only be undertaken if you know what you are doing.

Please note I take no responsiblity for any damage to parts of persons as a result of this article, sorry we have to cover our backs nowadays.(Mumbles something about lawyers).

Aims of the Project

I’ve been wanting to do a G4 to ATX case conversion for ages now, I really wanted to get a quicksilver case but they are a lot harder to come across. So I settled for a stock G4 case I bought from the US via Ebay. My aim for the conversion was that from the outside there was very little to differentiate it from a Apple G4. This means as

The Apple Mac G4 Case

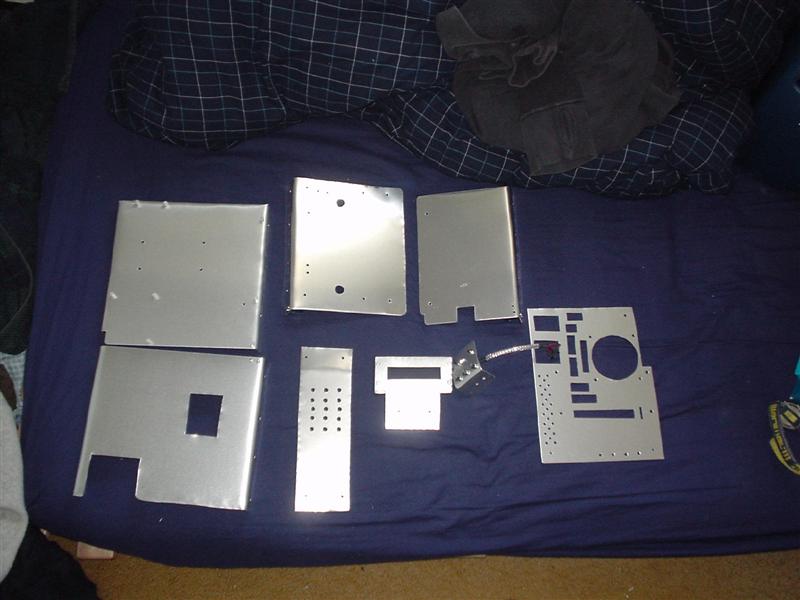
The stock G4 case is around the size of a MATX motherboard, with some main differences. The motherboard ports do not line up with the ATX I/O plate at the rear of the case and the Motherboard standoffs don’t line up either. In order to convert the case both these issues would haven to be addressed. The case itself is made of stainless steel with perspex panels to give the case its great looks. All of these panels can be removed very easily with a few clips and bolts. To access the inside of the case, there is a small lever and the whole right hand side of the case drops down with the motherboard in place. This gives excellent access to the motherboard, the lever can be prevented from opening for security reasons if neccessary by using the inbuilt padlock loop at the rear of the case. A great addition for LAN parties.

Project Bad Apple: Apple Powermac G4 case conversion

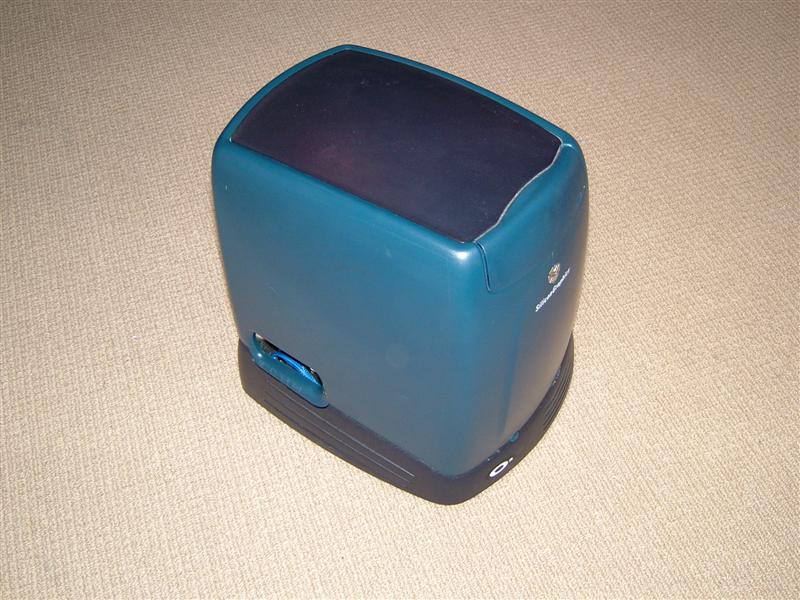
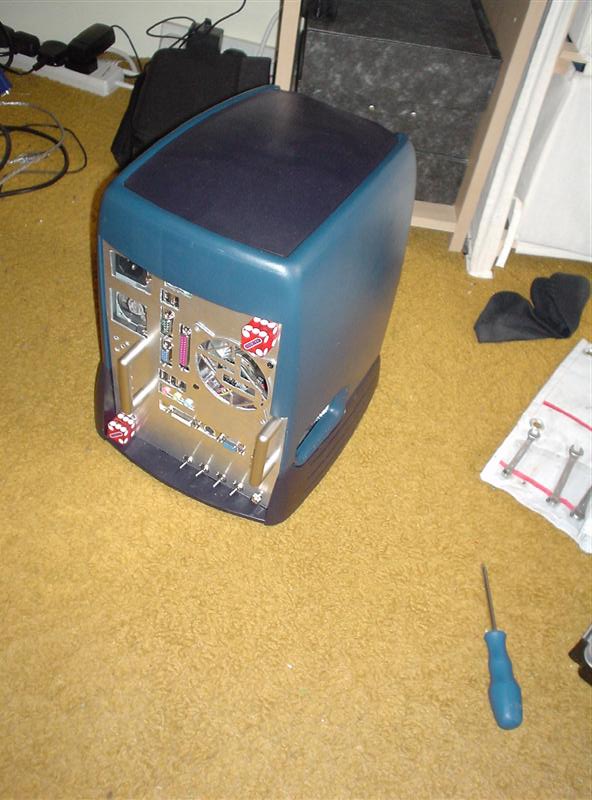
Here is the case fresh out of the box, it looks great.

Project Bad Apple: Apple Powermac G4 case conversion

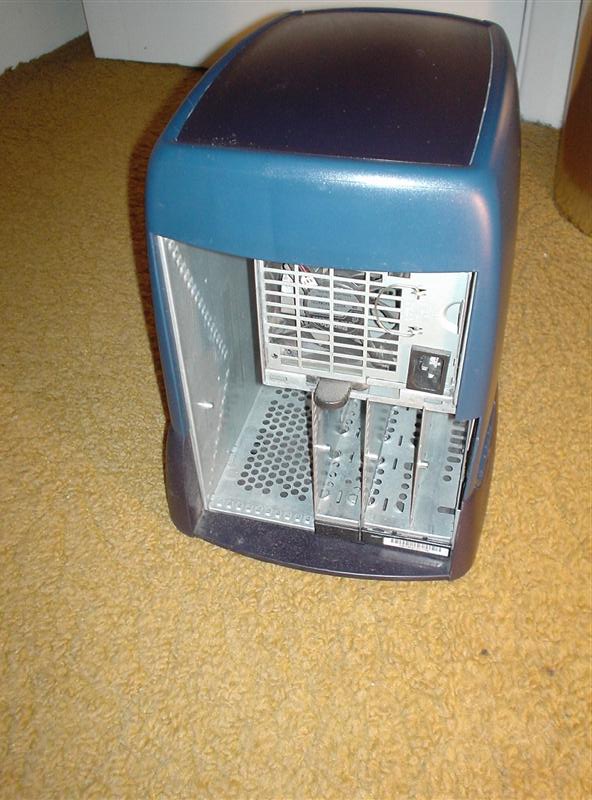
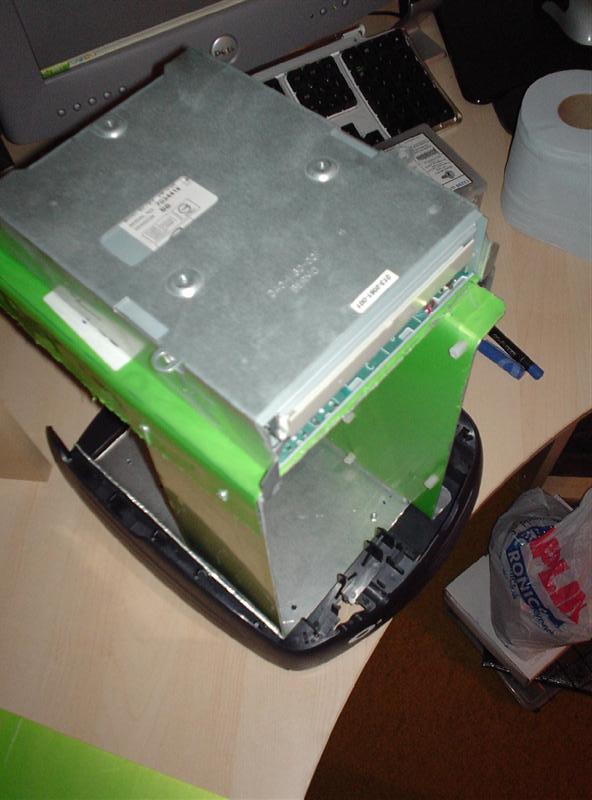
Next I opened up the case and look at what I was going to be modding. I then removed all the plastic parts from the case to get it down to its bare shell.

Project Bad Apple: Apple Powermac G4 case conversion

The bare shell from the front and two parts that need to be removed. The first is the wireless network aerial, and the second is the support for extra long pci cards and the slot for the wireless network card. Also on this is a small magnet which prevents someone opening the case while its powered on. I will take these off later.

Power Supply

The first part I wanted to fit was the Power Supply(PSU). In the stock Apple setup the PSU is similiar to a ATX sized one from a normal PC case. I didn’t need or want a PSU this large so I choose a smaller MATX sized one I had lying around from an earlier project. I decided to spray paint it a nice shade of metallic blue. I used normal car paint with a layer of primer then the colour coat and finally a clear coat to give a nice shine. The PSU fan is a 80mm sized fan but its thinner than a normal 80mm fan. Luckily the fans I choose (Coolermaster LED fan) fitted. The fan was modified as described later in this guide in the fans section.

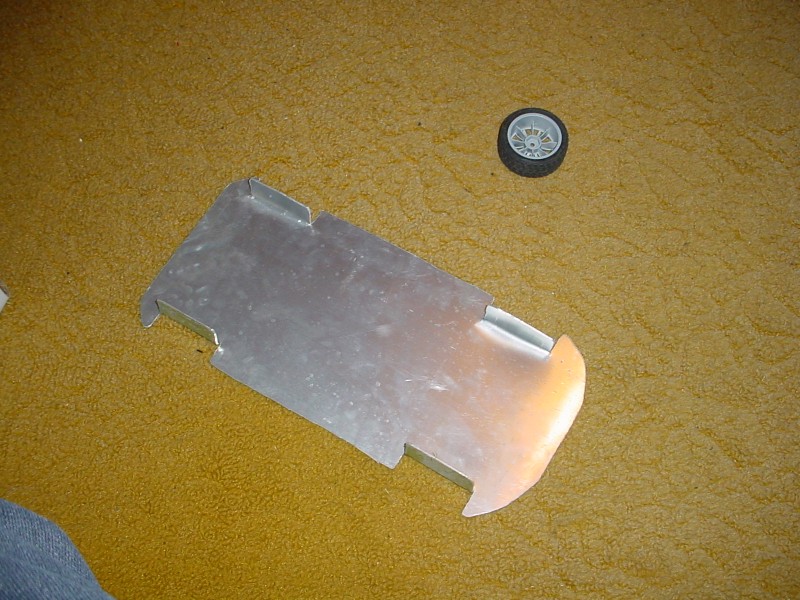
In order to attach the PSU to the case I need some kind of adapter, I had some spare perspex lying about and got out my Dremel and cut out a peice that would fit perfectly. The holes were then measured and drilled out so that it could be attached with normal pc type screws.

Project Bad Apple: Apple Powermac G4 case conversion

Fans

I am a real difficult person when it comes to fan choice, I want really quiet fans that look nice and can be controlled easily. I’ve not yet found my ideal fan but the best comprimise solution I’ve come across is the Coolermaster LED fans, they are clear fans with 4 LED’s for lighting (RED. BLUE , GREEN , WHITE or PURPLE in colour). The fan is quite quiet at stock speeds and can be modified to make them quieter. They are more importantly very cheap in comparison to the normal quiet fan options. I sourced four 80mm white versions for this project. One for the CPU Fan, one for the PSU, and two for the case cooling.

Fan Modification

In order to control the fans noise levels I wanted to be able to control the speed of the fans. This means adjusting the voltage supplied to the fans. Now in a normal fan this is easy, in LED fans things get slightly more complex. The LED’s in these fans are fed by the same power as the fan themselves, this means that when you lower the voltage supplied the LED’s get dimmer. Clearly this wouldn’t do, so I set about modifying the fan so that this wouldn’t happen.

The parts/tools I needed for this were:

  • Soldering Iron/Solder
  • Heatshrink
  • 1 x Resistor per fan (120Ohm)
  • Some wire
  • Wire Cutters
  • A lighter

The first step I took was to peel back the sticker that hides the wires in the center of the back of the fan. I held it back with a small section of bluetac.

The LED circuit is powered via three clear wires, so I unsoldered them from the fan keeping the two that were soldered on the same connection together (Positive wires). While I was at it I unsoldered the yellow wire as this won’t be used in the connector I am using.

Now I soldered the Resistor to the two power wires I had unsoldered before. After which I added a length of wire after the resistor and solder it into place. When I’d done this add some heatshrink over the bare wires and used the lighter to shrink it into place.

Now solder a length of wire onto the negative LED wire and heatshrink the bare cable. Once this is done you are free to use the connector of your choice. I’ve used a four pin connector similar to the standard three pin one. With the 2 fan leads and 2 LED leads connected.

Fan Control

To allow me to control the speed of the fans from one single point I devised a circuit that would allow me to power the fans from a single point. Its to be made of stripboard as its only a basic circuit.

The parts/tools I needed for this were:

  • Soldering Iron/Solder
  • 4 x 4 Pin female connectors
  • 2 x 3 Pin female connectors
  • Some wire
  • Wire Cutters
  • Rheostat fan controller.

The first step is to solder the four 4 pin connectors to the section of stripboard making sure there is space between them and that the copper tracks are connecting them together. Parallel to the 4 pin connectors solder in the two 3 pin connectors again space them a couple of holes apart. Once these are done you can add the wires , you need two wires powering two of the four pin connectors tracks. The other two that take the power from the top of the three pin connectors to the other 2 spare tracks on the 4 pin ones. After this add a positive and negative pair of wires that connect to a molex connector.

The basic circuit is now done, I have a rheostat which has 3 pin input and output which slots into the three pin connectors. This rheostat is mounted in a spare pci slot as its a convenient way of hiding the switch but it still being accessible.

Project Bad Apple: Apple Powermac G4 case conversion

I tested the circuit out on my shuttle machine and it worked perfectly. I then mounted the circuit using sticky velcro tabs onto the side of the PSU. All the fans in the system are hooked up to this circuit so one turn of the knob controls all of the fans.

Removing Unwanted Case Parts

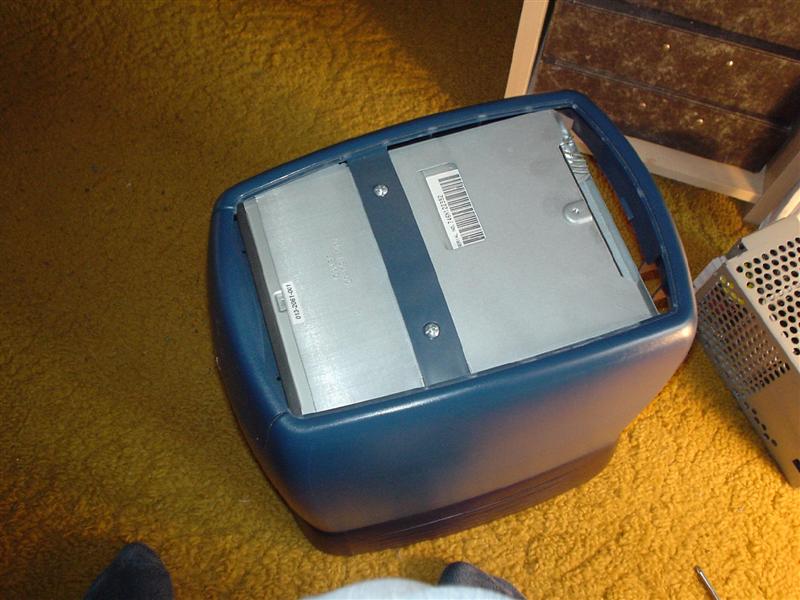
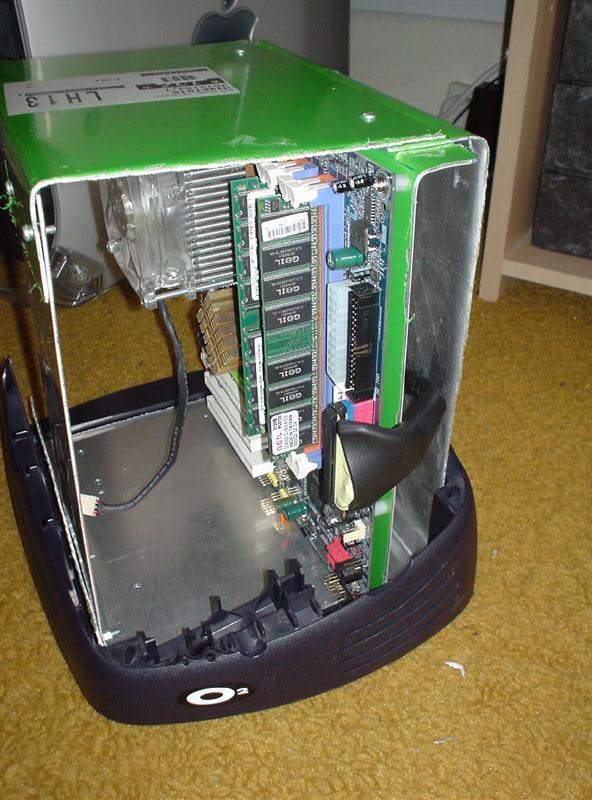
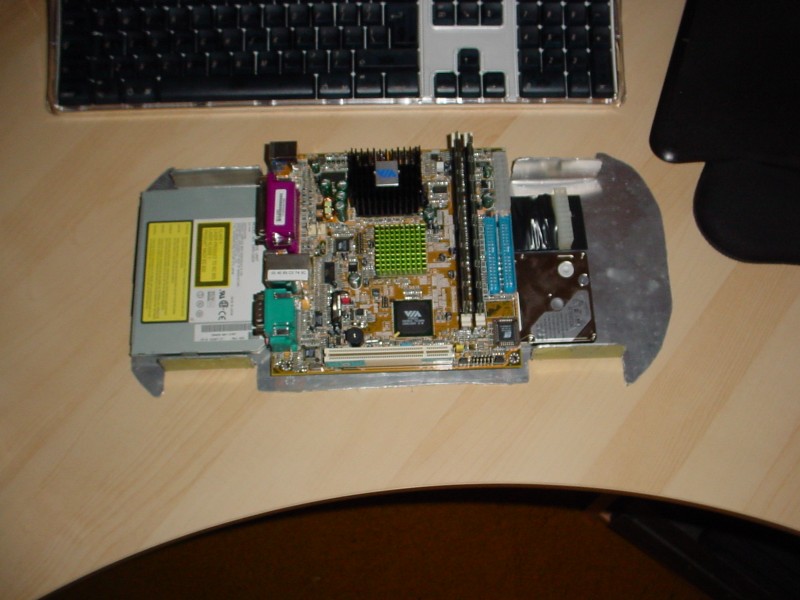
Lining the motherboard up for a test made me quickly realise there was going to be a major problem. The motherboard wouldn’t fit. The memory slots were hitting the section of the case where the cd drive was due to go. This was going to be a major pain in the backside. My first idea was to remove the central case strut and cd drive sections from the case, and run the Optical drive in an external case either USB 2.0 or firewire. With this decided I got out a drill and removed the rivets holding the central strut in place.

Project Bad Apple: Apple Powermac G4 case conversion

As you can see, in the picture above when I shut the side of the case, the memory slots hit the side of the cd bay; this would have to be fixed.

Project Bad Apple: Apple Powermac G4 case conversion

Then I removed the extended PCI card holder and wireless network slot again held in with rivets. This gave me a much larger space to work with. While I was at it I removed the aerial for the wireless network which is attached to the side of the case with small screws.

Modding the Motherboard

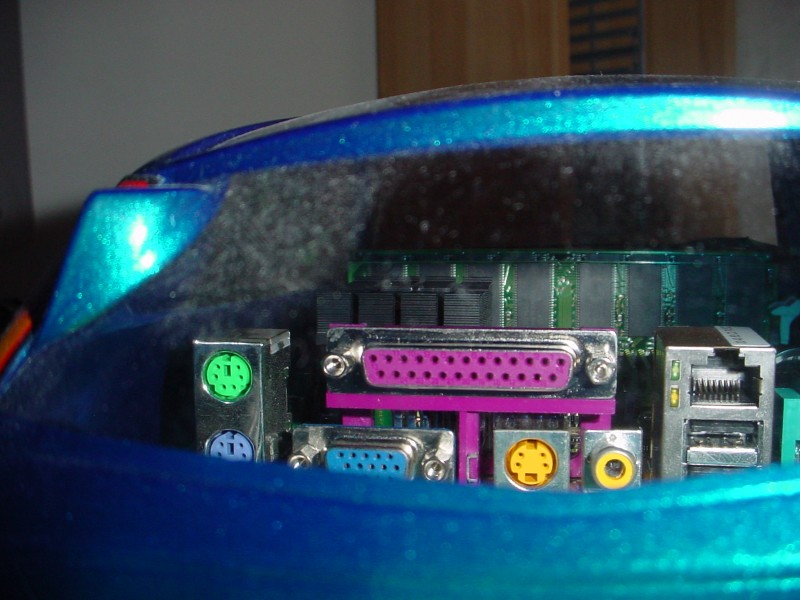
Lining up the motherboard for the first time showed another problem, the audio ports where not going to fit. These were too low on the standard ATX I/O plate and would hit the back of the case preventing the motherboard from being placed in the right place. The solution is to remove them from the motherboard entirely, which means attacking it with a soldering iron and wire cutters. Its not an easy job and you are very likely to kill the motherboard if you are not carefull.

The motherboard I am using is a Gigabyte GA-8IG1000MK, its a Intel 865G MATX board. The board is the best specified Pentium 4 MATX board I can find at the moment with onboard audio/network/graphics and other goodies such as SATA. I really liked this board.

Project Bad Apple: Apple Powermac G4 case conversion

While I was removing the audio connector, I decided to remove the parallel port as well as I never use them. Next I attacked the audio port, the minor side effect being blood pouring out of my finger. This modding lark hurts more than they give credit sometimes.

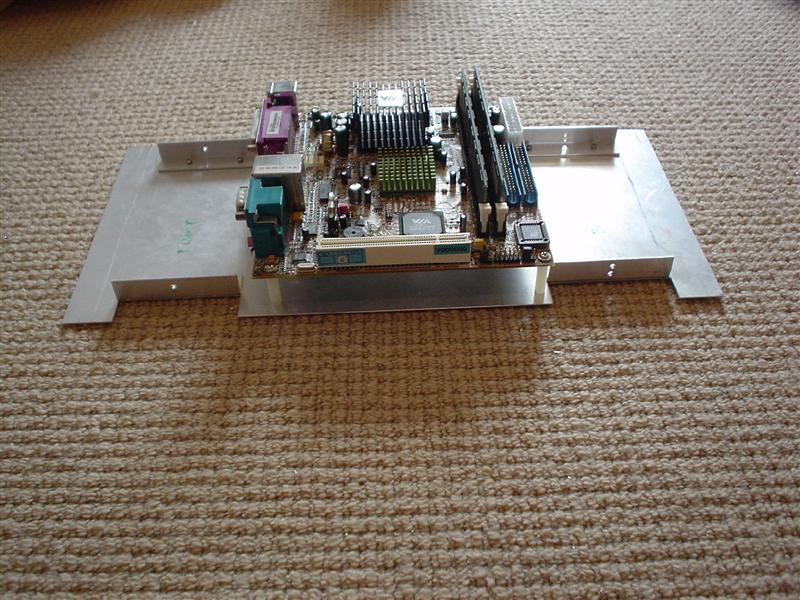
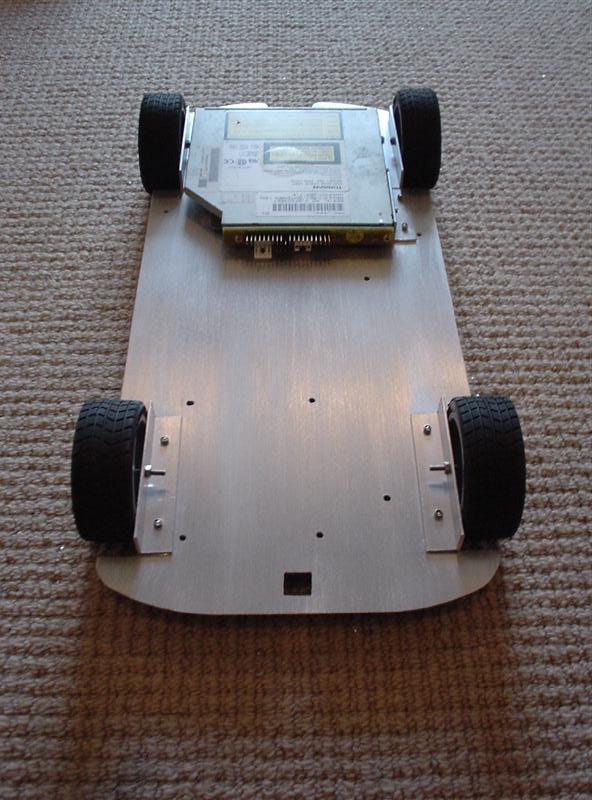
Mounting the motherboard

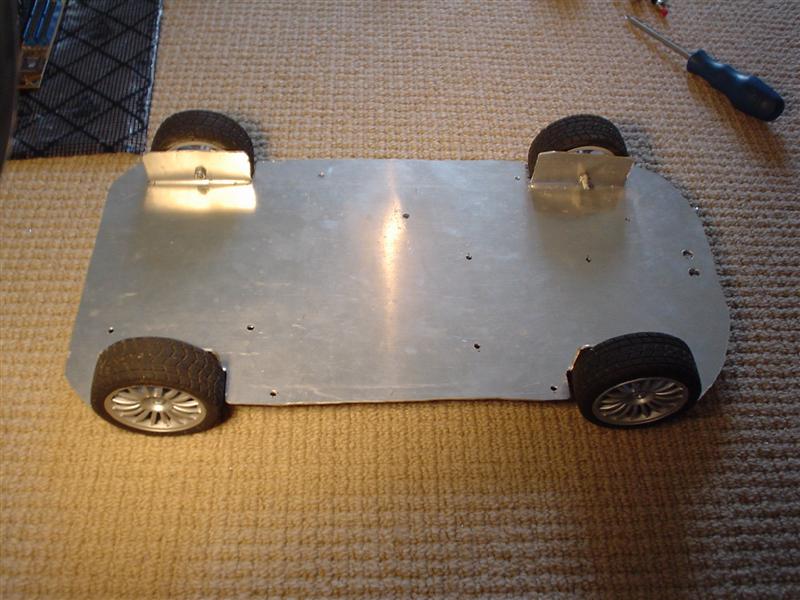
In order to fit the motherboard I was going to have to do a lot of work. I needed to cut off the old motherboard standoff’s and fit new ones.

Project Bad Apple: Apple Powermac G4 case conversion

Here the dremel fun begins, I have to cut off all the old motherboard standoffs with the dremel. Lots of sparks and dust later I had removed them all.

Project Bad Apple: Apple Powermac G4 case conversion

In order to get the motherboard in place I needed to cut the rear ATX I/O plate a bit, again I attacked it with a dremel.

Project Bad Apple: Apple Powermac G4 case conversion

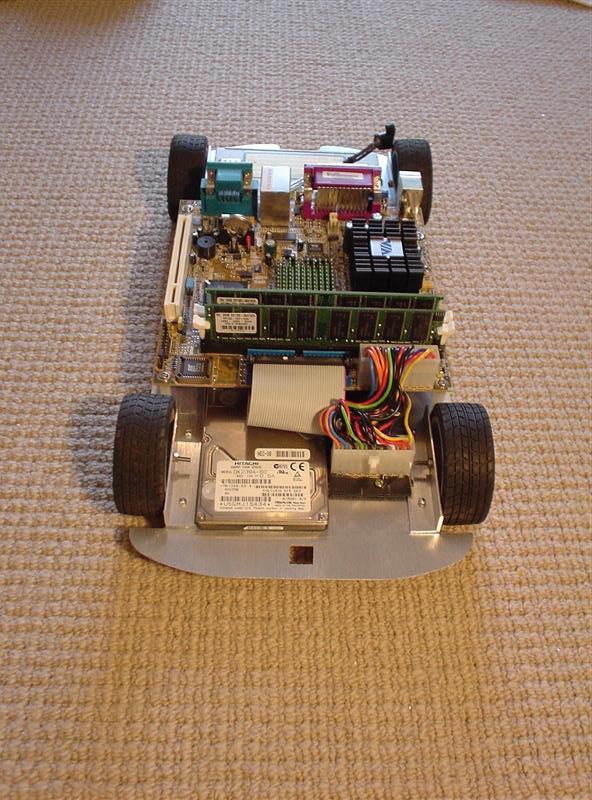
For the motherboard standoffs I used small 1cm hexagonal spacers. I had to drill the holes and make sure the plastic (Part of the door opening mechanism) was able to move as before. I finally got the motherboard in place. The project was starting to take shape.

Cooling

I wanting to find a great looking cooler for this project. It needed to support 80mm fans and be an excellent cooler. The obvious choice was the Swiftech MCX 4000. Overclock.co.uk, kindly provided the cooler along with a few grills and a filter for the bottom blowhole. Its nice to get some support from stores like Overclock.co.uk and its greatly appreciated.

Project Bad Apple: Apple Powermac G4 case conversion

The swiftech cooler along with the grills and filter. Mounting the cooler onto the motherboard requires the stock P4 mounting to be removed. Then the cooler is bolted into place. It looks great with the 80mm clear fan.

In terms of physical cooling the Swiftech is excellent. It is better than any other cooler I’ve used before. The temperatures with the fan on really low voltages is amazing.

CD Drive

I originally planned to use the normal layout of the standard Apple Mac G4 with the optical drive but this was not going to be possible. The next idea was to use an external drive bay but they are expensive and it wasn’t an ideal solution. However while looking at the case I realised that it would be possible to mount the drive on its side ejecting out of the back of the case. This would mean that I would need to remove the 120mm fan and its shroud but this wasn’t a problem.

Project Bad Apple: Apple Powermac G4 case conversion

First I need to remove the screw mounts for the 120mm fan, I attacked them with a dremmel and cut them off.

Project Bad Apple: Apple Powermac G4 case conversion

I intended to mount the drive using 2 brass brackets, after drilling the mounting points I realised I hadn’t taken into account the perspex handles at the drive wasnt able to eject. Luckily I hadn’t cut out the slot yet so I re-did the mounting with the drive raised higher.

Project Bad Apple: Apple Powermac G4 case conversion

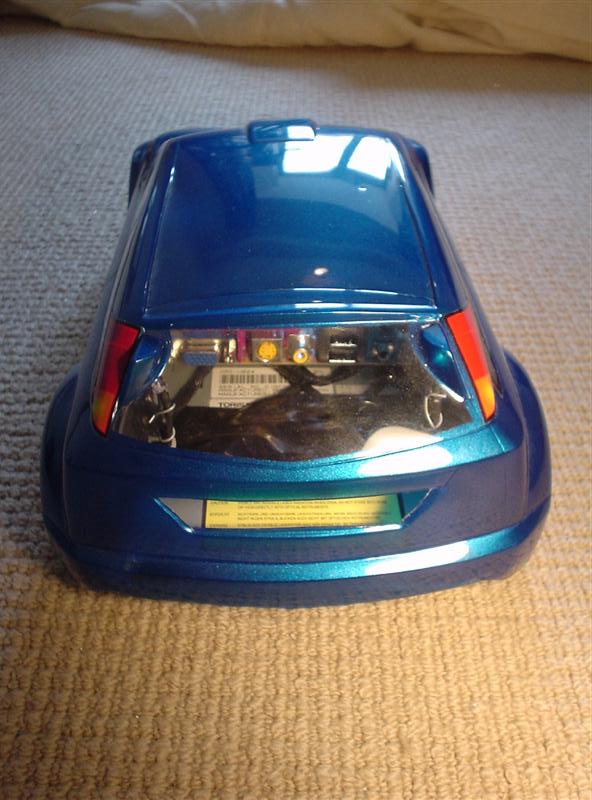
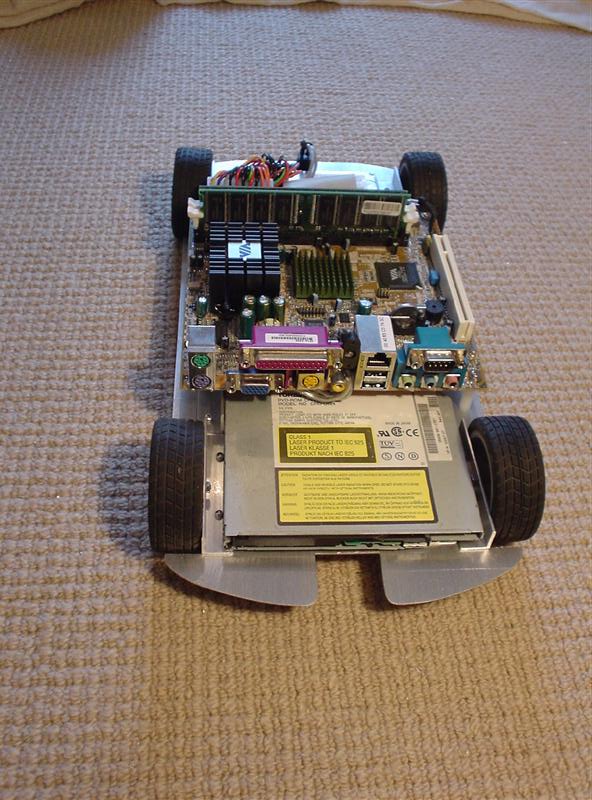
With the drive placement fixed, I cut a thin slot in the metal at the rear. The CD is ejected via Windows or pressing the button which is accessible through one of the old vent holes.

Project Bad Apple: Apple Powermac G4 case conversion

The slot being cut out of the perspex and the CD drive tray ejecting from the rear of the case.

Blowholes

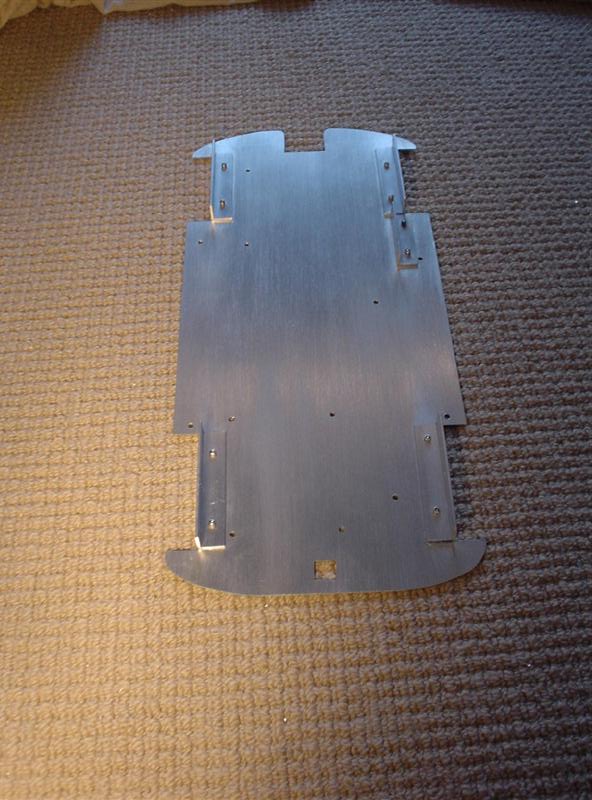
I had always wanted to add a fan to the bottom of the case, but with the 120mm case fan having to go I decided to stick a 80mm blowhole at the top of the case as well.

Project Bad Apple: Apple Powermac G4 case conversion

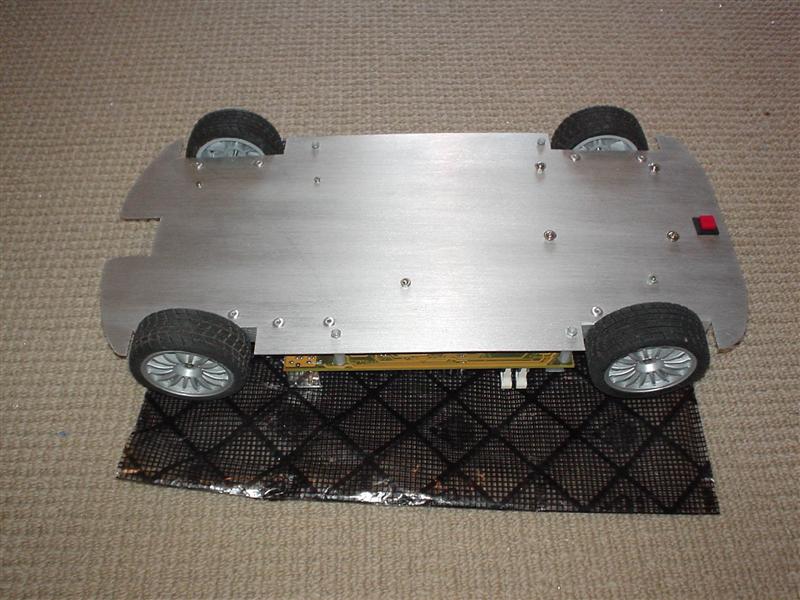
To make the bottom blowhole I cut out the hole with my trusty dremel. With the hole cut and filed back to shape. The bolt holes were drilled out as well.

Project Bad Apple: Apple Powermac G4 case conversion

In order to prevent dust being sucked up into the case I fitted a filter to the bottom fan.

Project Bad Apple: Apple Powermac G4 case conversion

With the top fan I repeat the same dremel process as before to create the blowhole in the steel chassis.

Project Bad Apple: Apple Powermac G4 case conversion

This time I added some blowhole trim as it is going to be on show. I then had to cut the perspex section as well to get air out of the case.

Project Bad Apple: Apple Powermac G4 case conversion

The perspex was again cut with a dremel then filed back to shape with a sander. With the white LED fans the top blowhole looks ace.

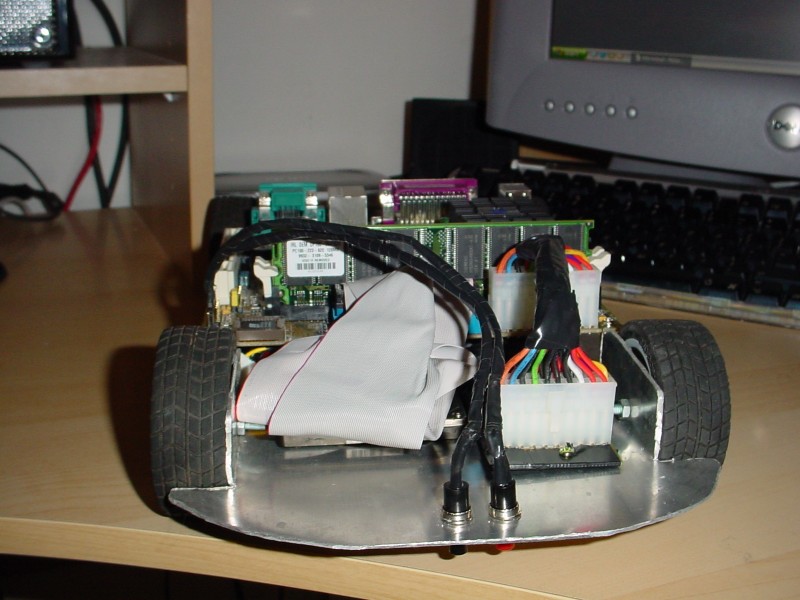
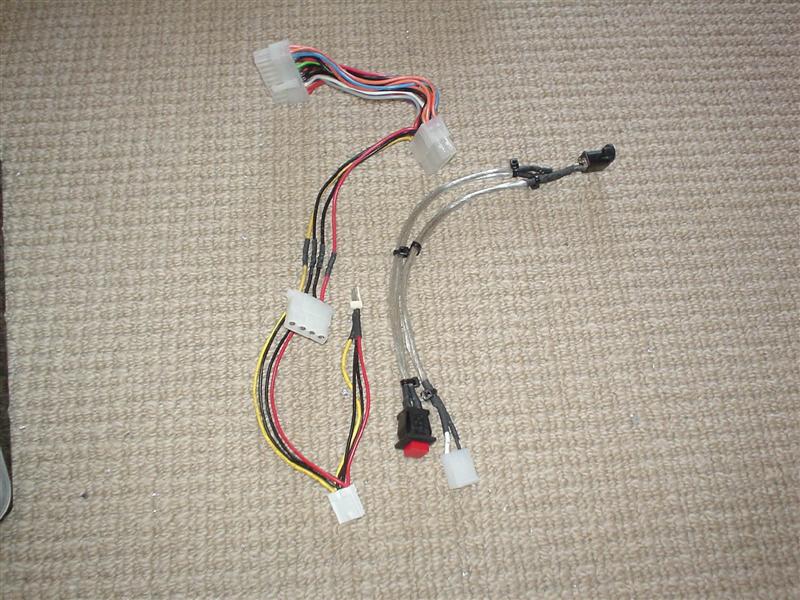
Extending the PSU Cables

Due to the way that the case opens I needed to make an extra long PSU cable, I sourced a male and a female atx connector and set to work soldering all the wires required. Its long and boring work but it was cheaper than buying one. I wrapped the finished cable in black tape to make it look at lot nice. I also extended the p4 connector to reach the motherboard.

Switch Gear

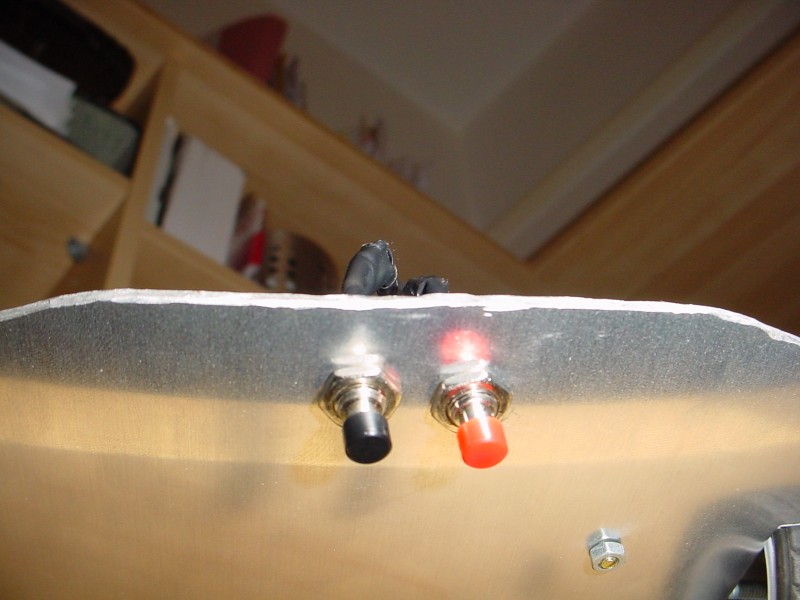
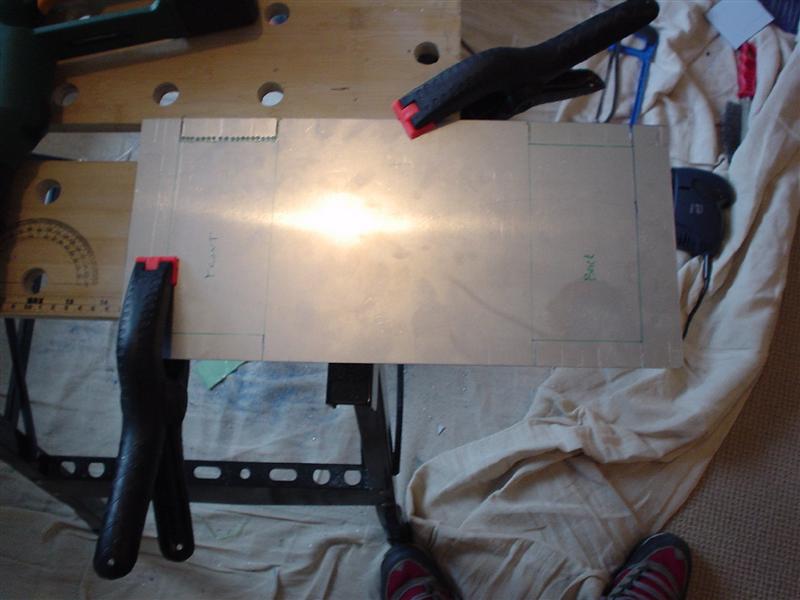
I wanted to use the existing switches to keep the case looking as standard as possible. The existing switch circuit is setup for the mac and requires alteration for pc use. I tried to convert it but it wasnt very succesful so I ditched the circuit and bought some cheap push to make switches. And set about making an aluminium plate to hold them in place.

Project Bad Apple: Apple Powermac G4 case conversion

Here is the stock circuit, its mounted inside a steel square which clips into place. On the back there was a reed switch which disables the power buttons when the case side is opened. I bypassed the reed switch entirely and tried some modification of the orginal ciruit but it didn’t work.

Project Bad Apple: Apple Powermac G4 case conversion

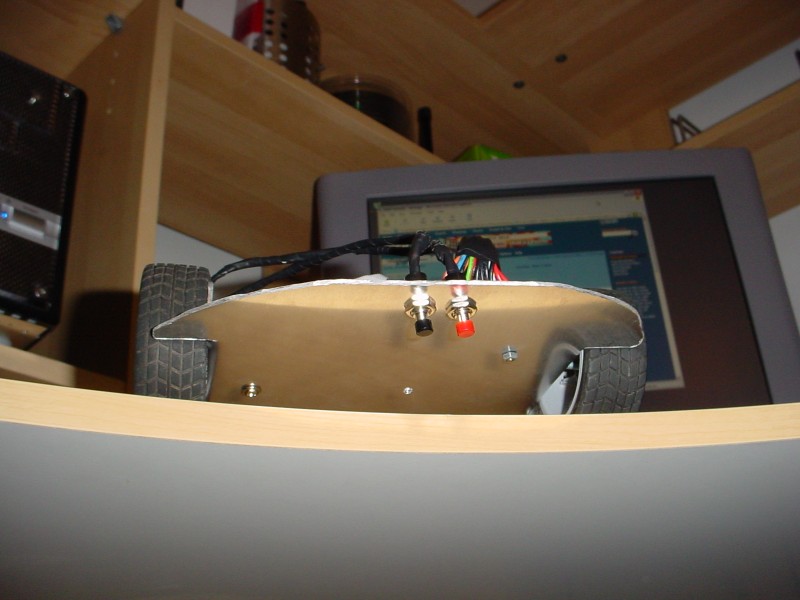
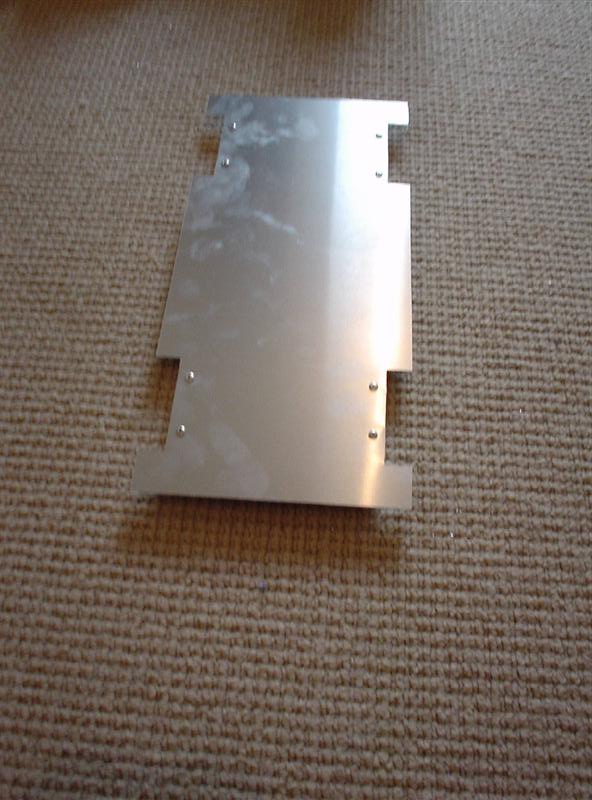
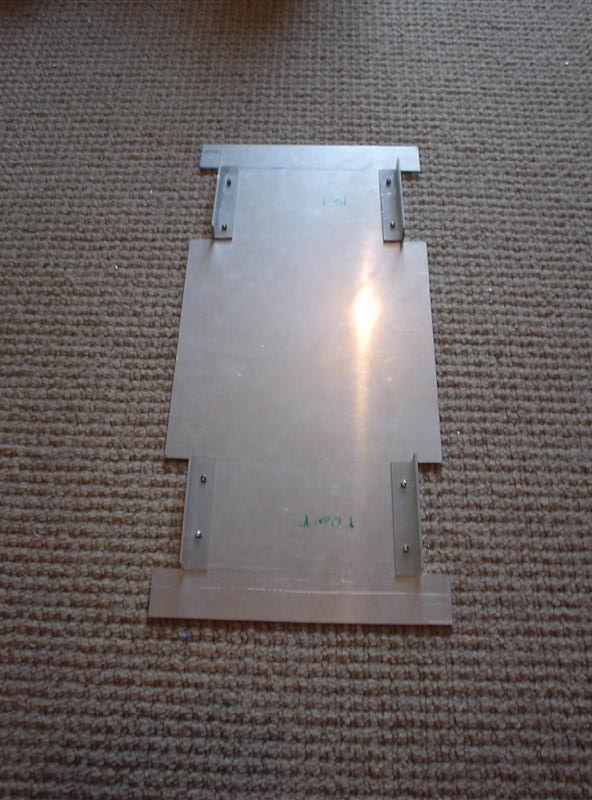
Here’s the alternate switch setup, I made a sqaure of aluminium and drilled the holes for the two switches and the LED.
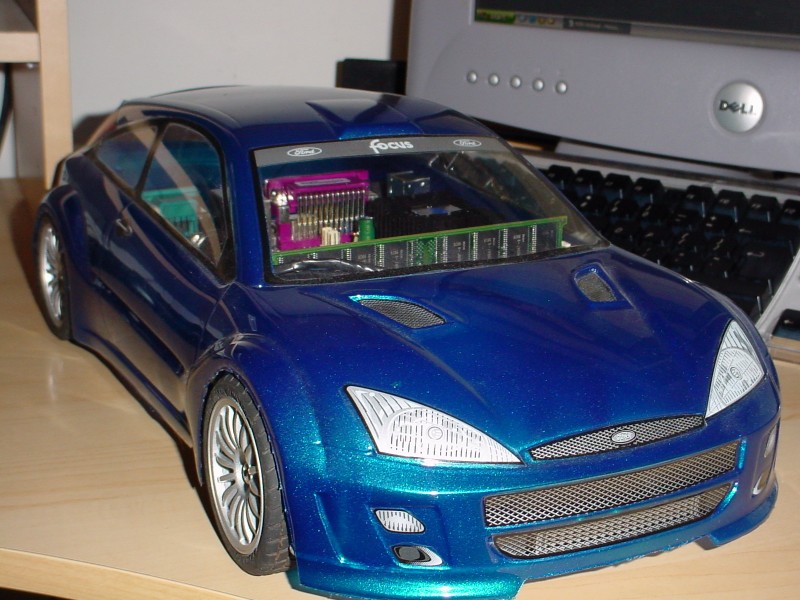
Finshing touches

With all the modding done it was time to put everything into the case and boot it up for the first time. It worked fine with the side down, booting first time. However, when I closed the case the system shut itself down straight away. I quickly found that the motherboard was shorting out on the square of metal keeping the plastic section used to open and close the case in place. I used some tape to insulate the piece of metal and it was all sorted. I took the perspex panels off and gave them a good scrub down in the bath and then removed the fine scratches with Novus polish.

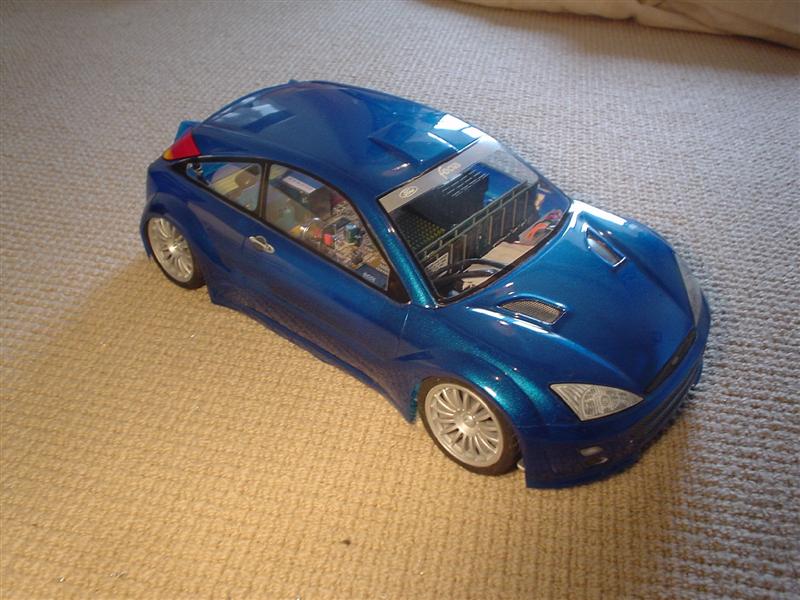
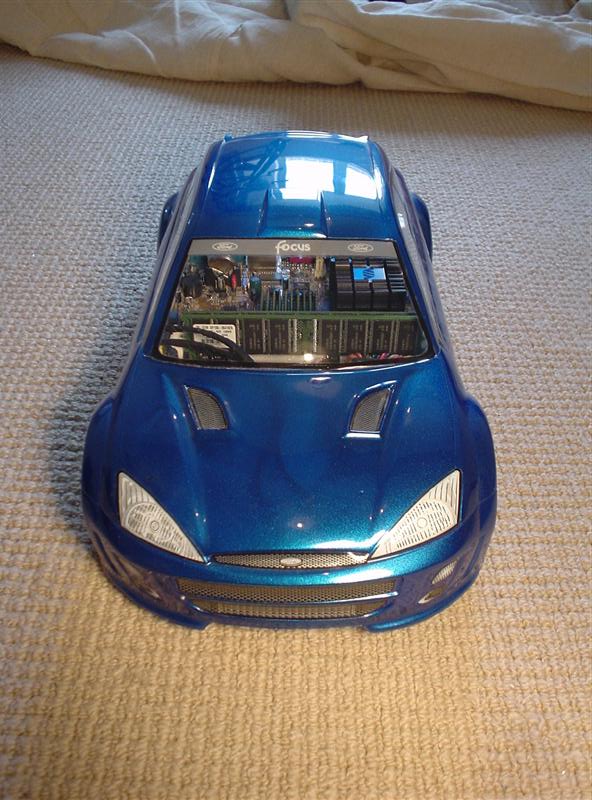
I use the system as my day to day system, using it for games and work. I love the case, it looks great and is fairly easy to cart around.
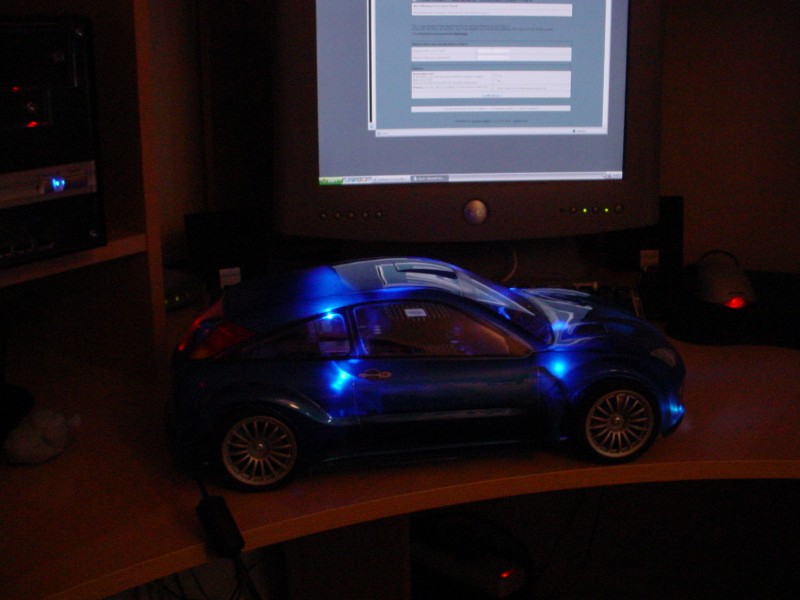
Gallery

Here are the final selection of pictures.

Project Bad Apple: Apple Powermac G4 case conversion

Project Bad Apple: Apple Powermac G4 case conversion

Project Bad Apple: Apple Powermac G4 case conversion